Feeds:
Posts
Comments

Archive for the ‘sewing’ Category

Felted Zakka

Zakka is a Japanese term that loosely translated means ‘many things’ and refers to little (usually handmade) things that are practical and improve your daily life.

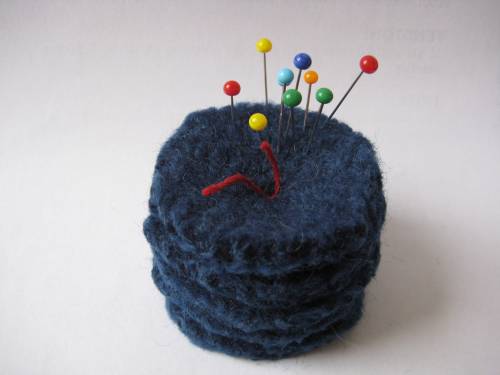
Here’s a quick, easy, and very tactile Zakka project that anyone can handle – A felted pincushion.

Grab some of Lincraft’s cosy wool (which felts up like a dream).  Any wool will do as long as it’s 100% wool and isn’t labelled machine washable. Cast on 30 stitches and knit for 30cm – or finish the ball if you like.  Cast off.

Throw your knitted piece into the washing machine with some soap flakes – or if you don’t mind waiting, just toss it in with each wash you do until you are happy with the amount of shrinkage and felting.  A hot wash is best, but the friction of other garments against your piece will give you some degree of felting.  This is a very forgiving project and a great introduction to felting.  If you want to experiment with putting the piece into boiling water, in the dryer or rubbing it by hand in hot water in the sink – go ahead.   Soap hastens the process and don’t forget to wear rubber gloves if you try the hand method.

When you are happy with the amount of felting you have achieved, hang it up to dry.

When dry, cut into circles (or squares), Stack them up and run a piece of embroidery thread (or wool) through the middle to hold your stack of disks together.

Variations:  Knitting stripes, or changing colours every 10 rows to give you a variety of colours to work with.  Just make sure the wool you are knitting with is natural (synthetic mixes do not felt as readily – or may not felt at all).

Zakka.  Love that word. 🙂

Read Full Post »

Booked

I have a bit of a fascination with handmade books.  They are a beautiful thing – to use, to handle  – to give.

But they can also be a lifesaver when it comes to keeping little hands busy and an amazing feat of dexterity and magic to children’s eyes as I learnt when my kids had to come into work with me the other day.  They each had a book to draw in in under 3 minutes and were seriously impressed.

Did you know we stock beautiful paper at Lincraft?  Of course you could use anything as an outer – old maps, magazine sheets, laminated paper or even cloth, but I found some in store the other day that was too good to leave behind – and it has something beautiful on the other side which makes for a really lovely effect when opening the cover.

How to:

Get some sheets of A4 paper and one special outer sheet.  Fold in half.  Stitch down middle.

Easy Peasy.

If you would like a smaller book, cut those sheets down the half way fold –  fold again and stitch down the middle – any size will work as long as it’s not too thick to go through your sewing machine.

Yep that’s it – you’re done.  Off you go….

Read Full Post »

Stretch

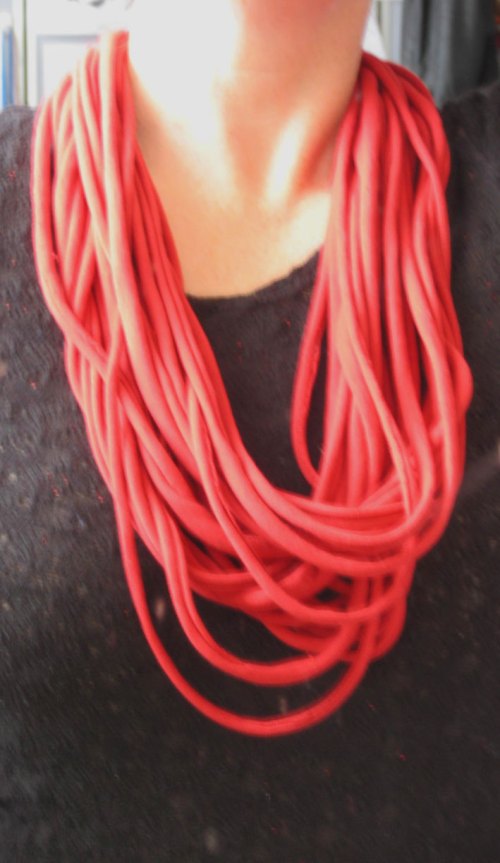
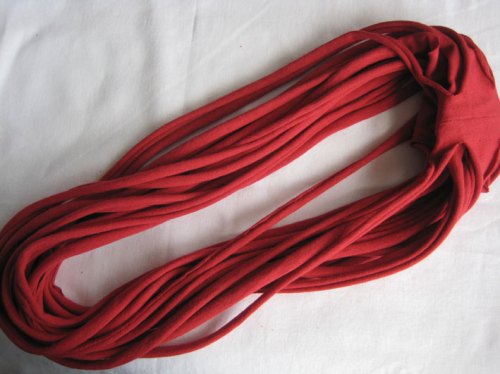
This project was all over blogland not so long ago in various incarnations.  I never tried it but meant to, so the last time I was in Lincraft I bought a metre of Jersey, and wouldn’t you know it – I’m in love….

Here’s how to make one yourself:

Most Jerseys are 140cm in width, so cut it in half down the middle to give you 2 pieces – one to keep one to give (unless you want a really super long set of loops – and then you could double them over.  Hmmmm – that would be good actually!  In that case buy half a metre.

Fold in half from selvedge to cut edge (make sure your grain is running top to bottom in other words) and sew a straight seam 1cm from the edge.  No need to treat the edges – we want everything to curl up on itself.

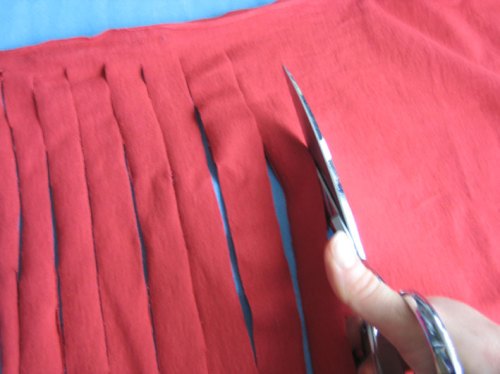
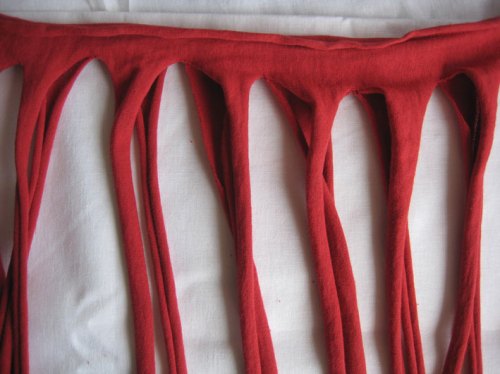
Cut into the fabric at 2cm intervals from the folded edge towards the seam – stopping 2 centimetres from the seam.  I know this seems to be a fat strip but trust me.

Put one hand on the seam, and pull the loop –  it will curl in at the edges and elongate.  The more you pull the longer and tighter it will get.

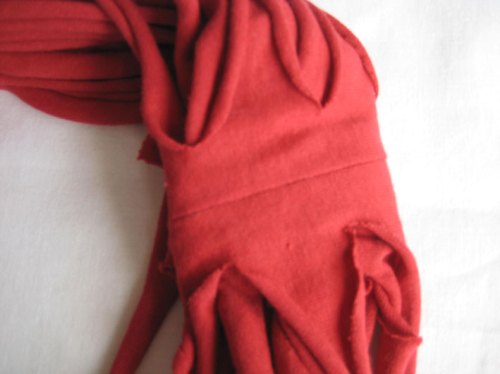
Put your arm through all loops and fold the ‘spine’ back on itself, and repeat – so you have 4 layers of spine.  You could sew these in place if you like, or just leave it loose.

You are done!

Lightweight and stylish and cheap enough to make one in every colour under the rainbow.

Read Full Post »

stitch me a forest

When I had my first baby I was firm about one thing.  I was not going to gender stereotype him.  I found it difficult to find clothes that were not directly aimed at a boy or a girl.  Same with toys – so many of them seemed to ‘celebrate’ the difference rather than provide a middle ground that would support him as a person.

Turns out he was a complete and absolute utter boy who was keen on that being as obvious as possible and who was naturally drawn to things with wheels that made noise, was boisterous and male.  Totally delightfully a boy.

My second was a total girl, and I found myself happily celebrating that difference and having learned that you can’t (and shouldn’t) water that down I just rode that train wherever it lead us.

But I still do feel that there should be beautiful things that are not aimed at boys, or girls, and can be passed from one child to another and back without any worry of gender confusion that seems to worry little ones.

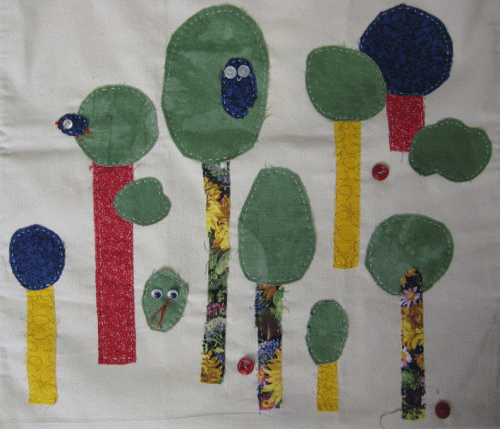
I try to bear that in mind when crafting – because sometimes a project can take time, and patience, and nobody wants that to be tossed to one side quickly.  So I made a forest with scraps, and buttons, small pieces and big and attached it to one of the new canvas bags that will be in store soon.

It couldn’t have been simpler and was surprisingly fast.

Long (and short) strips of fabric for trunks.  Ovals and circles for foliage.  A few creatures thrown in.

I love applique but find pinning small shapes fiddly, so I experimented with a glue-stick – and what do you know, it works!  The shapes stay where they are supposed to – pinned just in case but just once in the middle, which acts as a signpost for areas yet to be stitched.  Bit of running stitch around the shapes to hold them in place and 2 hours later it was done.

Lovely.  And very addictive….. I feel a larger project coming on.

Read Full Post »

spin

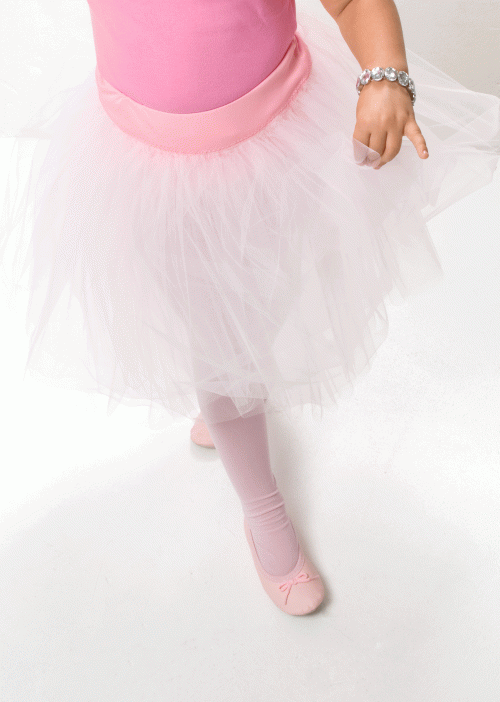
Introducing the perfect dress up ballet skirt.  Too fun!

This skirt is sized to fit 4-8 years, but you could shorten the elastic for a smaller child, add a longer waistband for a larger size, or make it extra long and tie it like a wrap around skirt.

You will need:

  • 2.8 metres of  Fine Tulle for the skirt (or more if you are making a larger skirt)
  • 20 cm of Stella Poly interlock fabric (or a firm jersey 120cm wide) for the waistband & ties
  • 45 cm of 20mm non-roll elastic
  • Large spool of thread to match colour of fabric and tulle
  • A sewing machine

Step 1:

Cut the waistband fabric in half, so you have 2 x 60cm wide pieces of fabric.  Set one aside for making the ties later.

Step 2:

Cut the tulle into 7 lengths of 40cm from selvedge to selvedge (each piece will be 269cm wide x 40cm deep)

Step 3:

Sew a gathering thread 1cm in from one edge of each piece of tulle along widest edge and working gently, pull the thread to gather the tulle into 60cm lengths.

Do this for all 7 pieces of tulle.

Step 4:

Working from the bottom up (like steps) and with one piece of gathered tulle at a time, pin and zigzag stitch over your gathered line to attach the tulle to the waistband.

Leave a gap of approx 1cm between each layer as you attach them to the waistband – this will give you a beautiful slightly rounded shape that will sit out nicely.

You may find that you have an uneven edge – or that the waistband has stretched slightly with the addition of the tulle.  If this has happened, lay the skirt flat on the table and trim the sides back to the required size.

Step 5:

With the right side facing you, turn the top over twice, and hem it over the top layer of zig zagged tulle – ensuring you have enough space in that casing to allow for the insertion of your length of elastic.

Step 6:

Attach a safety pin to one end of the elastic and run it through the casing – using the safety pin to guide the elastic.  Pin both ends to the edge of the waistband and sew in place.

Step 7:

Take the remaining piece of waistband fabric and cut it in half horizontally.  You will now have 2 lengths of fabric 10cm wide by 60cm long.

Zig zag all edges of the waistband ties.

With right sides facing, attach the waistband ties to each edge of the waistband, sew in place, fold back and then overstitch on the right side to strengthen the tie and make a neat edge.

Step 8:

Tie the skirt Around the waist of your ballerina and watch her leap about.

Read Full Post »

Tee-pee

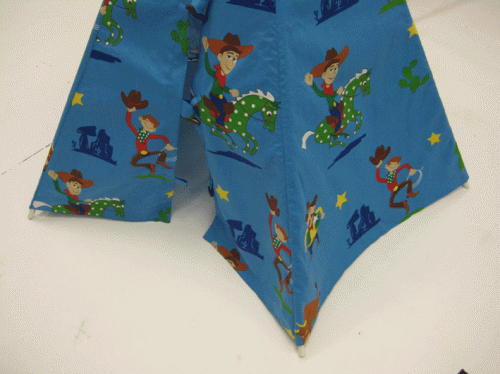
Some gorgeous cowboy fabric is coming into the store (maybe it’s there already), and while you’ll have to swallow the irony of making a tee-pee out of cowboy fabric, the results were good, and well worth the effort.

Bring it on:

Child’s Tee Pee

You will need:

  • 1.5 metres of lightweight interfacing (to draft your pattern)
  • 5.5 metres of “cowboy” 140cm uncoated fabric (available in blue or taupe).
  • 5 x 16mm P/C (powder/coated) Rod 150cm in white or Ivory. (available in the curtaining section of Lincraft)
  • Large spool of thread to match fabric.
  • 3 Large wooden toggle buttons
  • 2 (or more) large rubber bands
  • An iron
  • A sewing machine.
  • Sewing needle
  • Sticky tape.

Stage 1 – Drafting your pattern (5 pieces needed):

Fold your interfacing in half lengthways so there is a 45cm section that is doubled over. Pin lightly in place.  Mark out a vertical line 44cm high.  Measure sideways from this line a distance of 130cm and mark out another line that is 6cm high.  Join these two lines, and cut carefully through both layers of interfacing to make your first pattern piece (Main tee-pee panel – you will need to cut 4 of these in your fabric, being careful that they all point the same way).

Open out your interfacing again, and in the remainder mark out a narrower shape.  Mark one vertical line 51cm high, Measure sideways from this line a distance of 130cm and mark out another line that is 10cm high.  Join these two lines, and cut carefully to make your second pattern piece (Tee-pee front flaps – you will need to cut 2 of these in your fabric, being careful that they mirror each other).

In the remainder of your interfacing:

Mark out a rectangle (A) 45cm x 12 cm (Top tie – you will need to cut one of these from the main fabric)

Mark out a rectangle (B) 24cm x 6cm (Fabric to hold the toggles in place – you will need to cut 3 of these from the main fabric)

Mark out a rectangle (C) 16 cm x 10cm (Fabric loops to hold the toggles – you will need to cut 3 of these from the main fabric)

Cut all pieces carefully and write on the centre of each one how many are needed from the fabric and their purpose.

Stage 2:

Cut out your fabric pieces, being careful to ensure that all parts of the tee-pee body are pointing the same way.  We cut out the 4 largest ones first (one at a time) – keeping to the right side of the fabric, and ensuring the grain was straight.  The front flap pieces were then able to be cut from the left side of the fabric. Remember that these front flaps need to mirror each other – so turn the pattern over to cut the second piece.

You will find that there is fabric left over, which is unavoidable when working with a large print with such an obvious nap.  We suggest making cushions – or perhaps piecing together a floor rug to match with the leftovers.

Stage 3:  Sewing the tee-pee.

Our tee-pee is created using sleeves that hold the poles firmly in place.  These are created with a variation of the French seam, so don’t worry that there seem to be raw edges showing in the first step – they will be hidden by the end.

Step 1 – preparation.

Zig zag all edges of the tee-pee body.

Take one of your front flaps, and a main body piece.  Keeping the narrow edges of all pieces together, pin the wrong sides together, and stitch a 1.5 cm seam along the angled edge.  Take your next piece and join in the same way.  Keep going until all body pieces are joined with the seams pointing outwards to the right side of the fabric and finishing with the mirrored front flap.

At this point a good ironing will make your job easier.  Iron along each seam to flatten it out, and when finished, iron and pin a narrow hem along the top and the bottom edges.

Use a decorative stitch – or zig-zag if you prefer, sew all hems in place.

Step 2 – joining the front.

Take your tee-pee back to the ironing board and turn inside-out.  Pin the front flaps together and join 3cm in from the edge from the top down for 30cm.  Sew this seam, and hem the remaining open length of the flaps.

Step 3 – sewing the pole sleeves.

You must be precise about these seams as they need to be the right size to hold the poles snugly, but not so small that the poles can’t go in without a struggle.

*Tip – measure 3cm to the right of the needle on your sewing machine table, and mark that with a length of sticky tape.  Use this line as a guide when sewing and your seams will be the right width (a 6cm sleeve).

With the tee-pee inside-out, fold each panel flat, iron the seam, and pin down the length approx 3cm from the edge.  The raw edges should be well and truly hidden in these seams.  Using the guide marked on your sewing machine table, sew a seam 3cm from the edge for each adjoining panel making sure to reinforce the beginning and end of each seam to protect them from wear.  When all 5 sleeves are completed, turn the tee pee right side out.

Step 4 – making the fastenings.

Top tie (A) (decorative) Take the large rectangle piece you cut for a tie, fold it in half lengthways (right sides facing) and sew bottom and side, leaving one end open.   Turn to right side, and tucking a small hem in at the exposed edge, overstitch around all edges to fasten the open end and neaten the tie.

Toggle ties (B): The toggles we chose had a large enough hole to allow fabric to pass through.  If yours don’t you may wish to substitute 6cm lengths of ribbon or rope, and attach the toggles to the tee pee in your own fashion.  Otherwise, take the 6cm long tie lengths, fold in half lengthways, sew, turn right side out, and thread through the toggle holes.  Sew to the tee-pee by hand once the tee pee is completed..

Toggle Loops (C): Fold in half lengthways (right side facing), sew seam and turn right side out.  Fold in half vertically to form a loop.  Iron, and sew to inside the front flap of the tee-pee.

Step 4 – Assembling the tee-pee

With the tee-pee right side out (so sleeves are to the inside), insert each pole, being careful not to damage the fabric as you go.  You may find it easiest to do this on the floor as it takes a bit of fiddling once a few poles are in place.

Stand the tepee up, and start to fan out the base.  You will need to adjust the poles at the top to get it standing correctly.  When you are happy, hold the top poles in place with a few large rubber bands – which will grip and keep everything in place nicely.  Cover the bands with the decorative tie, and sew the toggles in place – ensuring they fit through the loops to close the tee pee.

Enjoy!

Read Full Post »
choker

I have a confession – sometimes it’s the limitations that are inspiring to me.  It’s those things that are ‘wrong’ that push me in another direction.  Do you find that too?

I was in the jewellery section looking for something that could be an interesting project and found – like most people I suppose – that the huge wall of options was a little confusing.  I ended up walking away with just a packet of 2 neck rings, and when they were home and out of the packet they seemed so thin compared with the one I usually wear.

And I had no beads or plan of what to do.

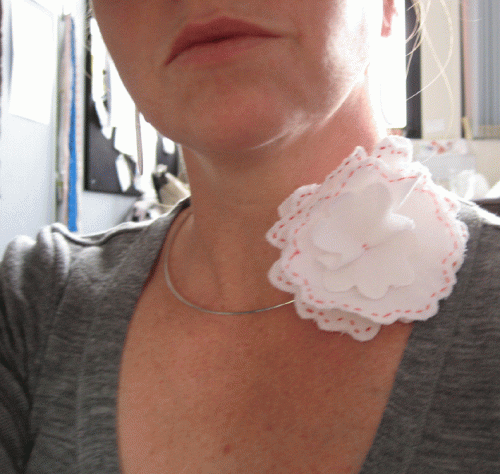
I did have a few scraps of fabric left over from another project though – so I cut them into squares, then folded them in half about 8 times and cut the outside edge into a rounded curve.  Once opened a flower presented itself.  I repeated this a few times, chose the best few, and traced the inside edge of a few of them in running stitch.

The flower was then layered up and fixed to the side of the neck ring with a button at the back – sewing through all layers of the flower through to the button at the back with the wire sandwiched between the fabric and the button.

With firm stitching the flower does stay to one side – and the delicacy of the wire presents itself as a much more comfortable and flattering option than a traditional choker.

Win!

Read Full Post »

wabi-sabi skirt

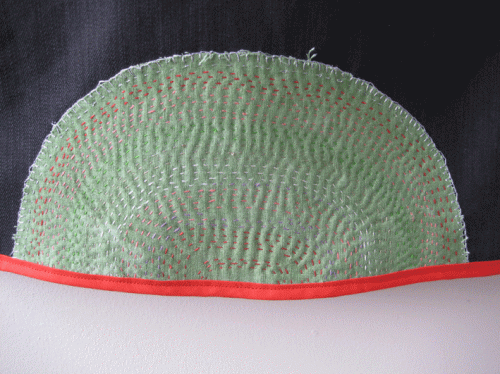
The wabi-sabi skirt is finished.

One of the really fun things about my job is getting to explore the possibilities of projects beyond the basics and let you know how to do it yourself.  This skirt – like all of my projects will be available as a free “how to sheet” in store at Lincraft and online – but here you get a sneak peek at things as they are progressing,  close-ups and more detail than can be provided on an A5 sheet.  Yay!

For those of you who need general details or can’t wait that long:

Skirt pattern : – McCalls #3341 made in dark denim – front and back only – don’t worry cutting out the waistband.

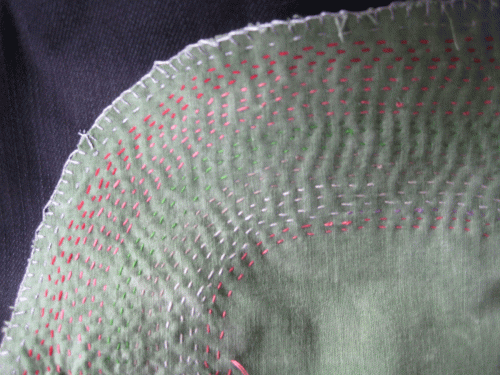
Fabric for front applique was a linen/cotton blend, dyed with Dylon dye in Amazon green and cut into a semi-circle using a dinner-plate as a guide.

Embroidered in Silver, Red, Pink, Green, Beige, Cream and lavender.

Bound top and bottom with Sullivans 25mm wide Poly Cotton bias binding instead of a more traditional waistband and turned hem.

When the official ‘how to sheet” is available I’ll let you know.

Read Full Post »

wabi sabi

Wabi-sabi – the japanese term for perfect imperfection  is one of those things that is so hard to define in western terms.  It is the beauty that lies in the small details that make an object, experience or way of living absolutely unique.  It is often the flaws that make a thing different from it’s neighbour, and yet, in crafting it is easy to slip into the habit of striving for ‘perfection”.  Making something look like it came from the shops and feeling like we have failed if there is something awry should never happen.  There is always a way to celebrate a flaw, improve on it and make something with more texture, richness or personality.

I feel strongly, that when so much of what is available is cheap and plentiful we should strive to celebrate the beauty that is inherent in a handmade object.  The fact that the soul shines out of it and that a part of the creator will always rest in the stitches or details that were so carefully chosen, is a kind of magic.

These days it is a choice to make a new skirt – and not a necessity for most of us.  We don’t need another scarf, we just need to bring home that luscious yarn we found in the store and want to justify the purchase and enjoy the wearing of it.

I dyed some fabric.

Beautiful cotton/linen. And did it roughly, letting the imperfections present themselves fully, then cut a semi circle to sew to the hem of an a-line skirt – which will be finished another day.

I wanted the mottled fabric to add texture beneath the running-stitch embroidery which celebrates the human touch, and the care in the stitching of the fabric to the skirt.  Intentional and a statement that imperfection is beautiful.  Beautiful to me because I chose it.

Wabi sabi.

Read Full Post »

« Newer Posts